Administrators Manual
<< Draft for proof-reading>>
1.IS: Install
Introduction
In this module, you will install Paratext 9. Paratext is the world’s leading software application for the development and checking of new Bible translation texts, or revisions to existing texts. Developed jointly by UBS and SIL International, it enables consistent and accurate translation, based on original texts, and modelled on versions in major languages. Due in part to its cutting edge collaboration features, Paratext greatly assists in producing higher quality translations in much less time than previous tools and methods have allowed.
Where We are
You may have already installed an earlier version and now want to install Paratext 9.
Why is this Important
Paratext 7, Paratext 8 and Paratext 9 can all be installed at the same time but you need to understand the limitation of using them together.
- Several versions may be installed
- Some use different data directories.
- My Paratext Projects (Paratext 7)
- My Paratext 8 Projects (Paratext 9 and 8)
- My Paratext 9 Projects (Paratext 9)
- Paratext 7 used a different server (which is now shutdown). Paratext 8 and 9 use the same data servers.
What are you going to do?
You will install Paratext 9 (without uninstalling Paratext 7 or 8). You will also install an update from an MSP file.
1.2 Install Paratext 9
Note: you do not need to uninstall and earlier version of Paratext. But you may need to uninstall an earlier BETA version of Paratext 9.
- Double-click on the installer file.
(available at https://paratext.org/download Paratext_9.3.103.1_InstallerOnline.exe Paratext_9.1.104.1_InstallerOffline.exe
- Click, “I agree to the license terms”,
- Click Install.
- This step might take a few minutes if the installer needs to install the .NET 4.8 Framework on your computer.
- If a dialog appears and asks for your permission, click Yes or provide the credentials as required.
- A welcome message is displayed.
- Click Next
- The destination folder step appears.
- Accept the defaults for the folder.
Note: Paratext 9 and 8 data share the same directory but Paratext 7 needs a separate data directory.
- Click Next, then Install
- Click Finish and then Close.
The first time you launch Paratext 9 you will need to enter your Paratext 9 registration code. Information on how to obtain this code is on the Registration page.
1.3 Register a user (first time run Paratext)
Paratext 8 and 9 use the same registration. but all Paratext 7 users need a new registration for Paratext 9.
- Run Paratext (for the first time)
- Choose the interface language.
- A dialogue box is displayed asking for your registration code.
- In your browser, go to https://registry.paratext.org
- The Sign-in page is displayed.
- Log-in with a gmail work account
- Click on the Register link
- Type in the user name
- Type in (or copy) the user’s Paratext 7 registration code
- Copy the new code
- Return to Paratext
- Paratext will paste the code
- Click OK
1.4 Manually updating your existing version of Paratext
The update files have a .msp extension instead of PUD or SPUD as in the past.
- Make sure Paratext is closed.
- Double-click on the msp file to install the update.
2. MD - Migrate Data
2.1 Introduction
Migration is the process of moving a project (including all settings files) from Paratext 7 to Paratext 8 (and then opened in Paratext 9). Paratext 8 projects can be read in Paratext 9 without migration. since Paratext 9 does not have a migration feature, any remaining Paratext 7 projects will need to be migrated to Paratext 8 first.
Where We are
You have a Paratext 7 project that you want to use in Paratext 9. You also need to have installed Paratext 8.
Why is this Important ?
The Paratext 7 server was closed down several years ago, so no Paratext 7 project is being backed-up on the server. Also in order to get the full functionality of Paratext 9 your data needs to be migrated. Since Paratext 7 and Paratext 9 use different send/receive servers all members or the project team must be using Paratext 8 or 9.
Users can have all versions of Paratext 7, 8 and 9 installed on their computers at the same time, but just run one at a time. No project can be shared simultaneously with users in Paratext 7 and users in a different version of Paratext.
Once you have migrated the project, everyone on the team needs to receive the migrated project, and only do work in Paratext 8 or 9 from then on.
You need to have a good Internet connection to migrate the project, but after that, if you usually work without an Internet connection, you can keep working that way in Paratext 9 once the project is migrated.
What are you going to do?
You will
- ensure you have the master copy of the Paratext 7 project
- open the project in Paratext 8
- register the project
- migrating the data
There are alternative notes on https://paratext.org/paratext-help-and-support/migration/
2.2.1 Prepare a project for migration
All your users have to upgrade at the same time.
In Paratext 8, go to File > Open Project/Resource.
- Make sure the box at lower left “Show Paratext 7 projects” is checked.
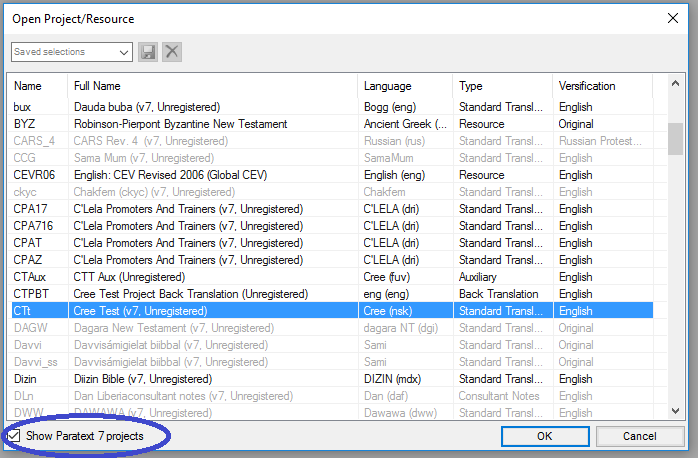
Select your project.
- v7 means Paratext 8 sees it in the Paratext 7 projects folder.
- Unregistered means it isn’t registered for Paratext 8.
Click OK.
Paratext will open the migration dialogue box.
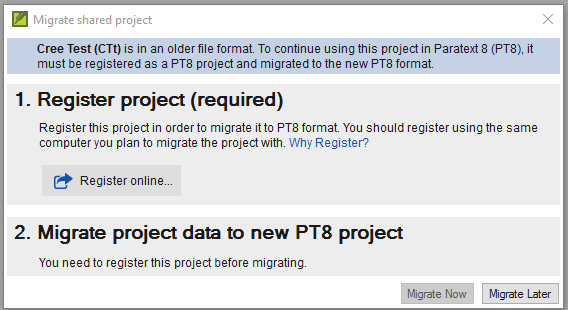
### Step 1. Register project


There are two main steps to migration, each covered in detail below: **Project Registration** and **Data Migration**

1. Click **Register Online** button
    - The Register Project form (shown below) should appear.
2. Fill in the web form see explanations below.
Note: Fields with an asterisk * [red star] are required.
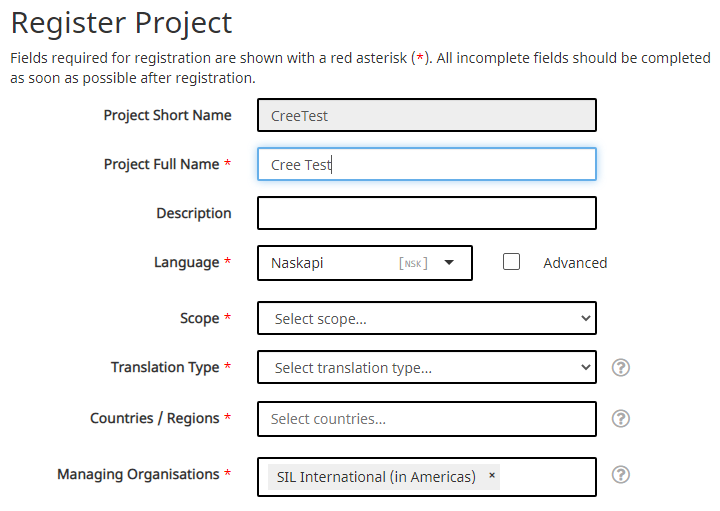
Short name: This is filled-in for you from the project. You cannot change the project short name.
Long project name: You can change the long project name if desired.
Description: add more information here if you wish to. There are also fields for more information about the project in the second part of the form.
Language: The language name has to match an entry in the Ethnologue database.
- Click the “**Advanced**” box to fill in more information if you need to distinguish the language of your project from the language with that Ethnologue code.
- The advanced form looks like this, where choices you select under Script, Region or Variant add extra letters and numbers to the identifier.

Scope refers to which books you intend to translate, for example
- the whole Bible,
- New Testament,
- Whole Bible plus Deuterocanon,
- Portions, etc.
Translation Type:
- choose **First** if this is the first translation in this language,
- choose **Revision** if it is a revision of a previous translation,
- choose **New** if it is a new translation but a previous translation does exist for the language.
- choose **Study/Help materials** for translations including study materials, such as a study Bible.

:::tip

For a revision, you have to specify that you have permission from the rights holders of the translation you are revising.

:::
Country select the country or countries where this translation is intended to be used.
- You can type a few letters of the name then pick the desired country.
- You can specify more than one country if the language spreads across borders
Rights holder would be the organization you expect will have the copyright for a print edition. This can be changed if it needs to be later on. Choose from the list the likely rights holder for this translation.
:::tip

If the eventual rights holder is an organization yet to be formed or recognized, choose something from the list and edit the registration later.

:::
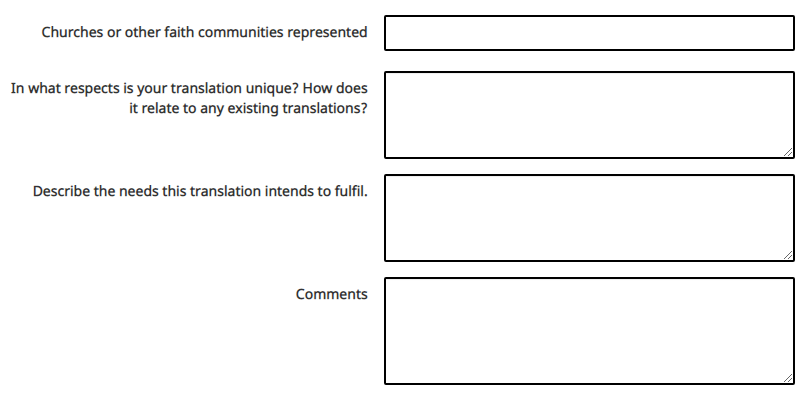
More information The second section of the registration form contains several places you can add supplementary information about your project. None of these fields are required.
Visibility
Standard is the default choice. Information about the project is not available to the public, but only to registered Paratext users within the same organization.
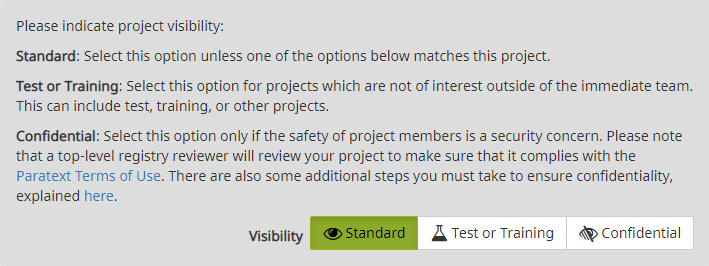
Test or Training is good for testing projects or projects you only create to use in a training program or workshop.
Confidential is for situations where entering information about your project online is a security concern. Information is restricted to members of the project and to those who manage the registration data for the organization.
Consent
The last requirement for registration is to indicate that you will comply with the Forum of Bible Agencies International translation guidelines (a link is provided) and that you agree to keep a backup copy of your project in the Digital Bible library. The Digital Bible library will not share your project with anyone without your express permission.
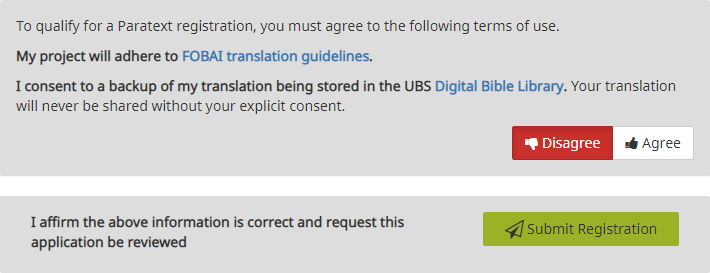
When finished filling out the registration information,
- Click Submit Registration.
- If the information is complete, the site should tell you that the registration was accepted. (You may need to scroll to the top of the page to see this).

- Go back to Paratext
- it should have detected that the project is now registered.
Update or change registration
If later you wish to update or change your project registration, in Paratext you can
- Go to Project menu > Project Properties and Settings
- Click the Manage registration link at the bottom of the General tab.
- Or you can go in your web browser to registry.paratext.org,
- find your project and click “Edit”.
The Digital Bible Library is a tool for making translations available online or for mobile users, but your project will not be available to anyone until you agree to make it available.
To submit the registration, click Submit Registration.
Go back to Paratext.
It should detect that the project is now registered, and inform you of that.
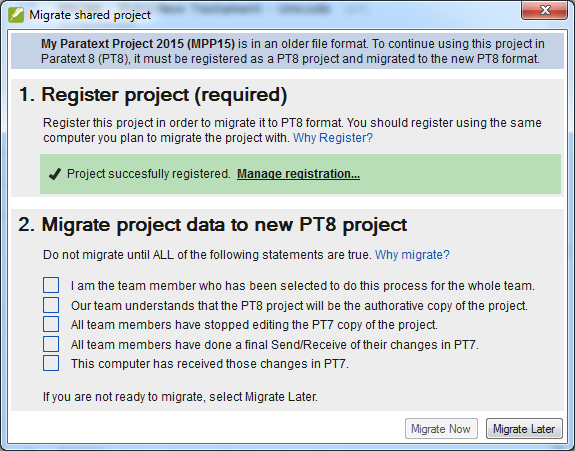
Migrating a registered project
- The migration step has several boxes you have to check off to verify that you understand what is involved.
- Put a check in these boxes if they are true
- If it is not true then you are not ready to migrate. Do whatever is necessary for them all to be true.
- Click Migrate Now to
affirm the above information is correct and request this application be reviewed
- or **Migrate Later** if you need more time to finish preparations then come back and click Migrate Now.
- When you click **Migrate now**, Paratext will copy the project from your Paratext 7 into your Paratext 8 folder and will also do a send/receive to the Internet.
Send/receive warning?
Paratext 8 is able to check if the Paratext 7 project on your computer has new changes since the last send/receive. If it detects this, it gives you a warning.
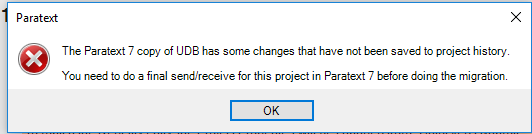
If you get the warning
- Click OK
- this stops the migration process,
- Mark a point in the Project History in Paratext 7
- Project > Mark a point in the Project History, type a comment, OK
- Then Restart the migration in Paratext 8.
- Open the project in Paratext 8
- Check the boxes
- Click Migrate now.
- A message should be displayed to say the migration should be successful.
- Now your colleagues can go to Paratext 9 and do a Send/Receive to receive the migrated project.
2.3 Additional Project settings
- Language identifier: After you click “Migrate now”, Paratext 9 may tell you that need to specify a language identifier for your project.
- You can verify what the language name and language identifier are for your project by going to
- ≡ Tab, under Project > Project Properties > Language settings.
- The language identifier is either in brackets after the language name, or listed separately below the name.
- ≡ Tab, under Project > Project Properties > Language settings.
- You can verify what the language name and language identifier are for your project by going to
- Books The project properties and settings has a Books tab, you specify here the books that you plan to track their progress in your project.
- You can choose book by book, or specify Old Testament, New Testament, Deuterocanon by using the buttons. You can change this list of books later on in the project if your plans for the project change.
Note: Once you have migrated your project, you also need to migrate the back translation and any other daughter projects (one after the other).
Remember, do not edit the project in Paratext 7. That would be wasted effort as no one else will see their changes.
To help your team members remember this, you could have them remove the project from their Paratext 7 once they have it in Paratext 9. Or maybe they can uninstall Paratext 7 from their computer if they don't need it for other projects.
3. REG: Registration
3.1 Introduction
Starting with Paratext 8 it is a requirement that projects share their basic metadata information with the translation community. It is strongly encouraged that they share progress information [some organizations and/or donors may require this].
Where We are?
Paratext 9 has been installed on your computer and you have the Paratext 7 registration codes for your team members.
Why is this Important?
In Paratext 9 both users and projects should to be registered. Access to specific text resources, e.g. TEV, is determined by what organization you are a part of.
Projects may be registered by the administrator (or a consultant serving as an administrator)
Other organizations/users are notified and may object to BoG. Basic project metadata information is available to all in Paratext community
If your project is not registered you will not have access to
- Interlinearizer
- Internet Send/Receive
- statistical glossing tools (guess translation)
- Print Draft
What are you going to do?
- You will register a P9 user
- You will register a new P9 project
- You will see what information is displayed in the Paratext Registry for a registered project.
3.2 Register for (with a Google account)
Go to https://registry.paratext.org in your web browser.
- The “Sign in” screen is displayed.
Enter your email account.
- The site will check if your account exists, and if it is on a Google server, you will have the choice of authenticating with Google.
Choose to authenticate with Google
- A new screen is displayed asking for your password.
Enter your Google account password.
Click yes to authorize the Paratext site to use your profile information.
You are then ready to start filling in your Paratext registration.
If you do not have a Google address, see section 3.4
3.3 Filling in the registration
- Click the appropriate circle to choose your registration type (new registration, previous Paratext 7 registration, or previous Paratext 9 registration).
- If you are a Paratext 7 user, fill-in your Paratext 7 code
- Choose your organization from the list, or if you are not a member you can leave this blank.
Anyone can register to use Paratext, but people who are not members of a translation organization and who are not members of a registered project will not be able to use all the features of Paratext and will have access to only a few resources.
Select your country.
Enter if relevant your field entity and your supervisor
Explain why you want to use Paratext.
Check the box at the bottom if you want to get email announcements about Paratext updates and news.
When finished, click “Register”
The server will give you a code. It will also send this to your email.
noteKeep that email, or the code that is displayed here, because if you lose it, there is no way to look it up again. (This is a security feature, user codes are not stored on the server so they cannot be stolen if someone hacks onto the server). However new codes can be generated see 3.55 below.
3.4 Register for Paratext with a non-google account
- If your email account is not on a Google server, or if it is but you choose to not use Google to authenticate, the registry server will ask you to enter a password.
- Enter the password you want to set up
- Enter it again as a confirmation
- The server will send an email to your account with a link to verify.
- Open your email, go to the link, and proceed to register for Paratext (see [3.3](filling in registration)).
3.5 Change (generate) a new Paratext code
There are many reasons why you may need to change your Paratext code, one common reason is if your computer is stolen or crashes.
Change your own code
- Go to the registration website, https://registry.paratext.org .
- Log in (if you are not logged in)
- Click on your user name at the top left.
A menu is displayed.

- Click on Settings.
- Below Paratext, click Registration.
- The registration Details screen is displayed.
- Click on the Generate button to generate a new code.
- The code will be sent to your email address.
- Start Paratext
- If it connects to the Internet it will detect that the old code is no longer valid, and it will ask you to update your registration info.
- Go to your email, and copy the new code.
- Go back to Paratext
- It may already have pasted in your new code.
- If it has not, paste in the new code into the registration form, and click OK.
- You should be reregistered.
- You will need to do this on any other computer that your Paratext code is installed on as well.
- If Paratext is not connecting to the Internet to detect that you need to give a new code, go to
- ≡ Tab, under > Help > Registration Information and paste the code there.
3.5.2 Change a user's code (who you registered)
- Go to the registration website, https://registry.paratext.org
- Log in (if you are not logged in)
- Click on User
- Click on the user's name in the list
- Click on the down arrow beside View
- Choose Generate code
A message is displayed.
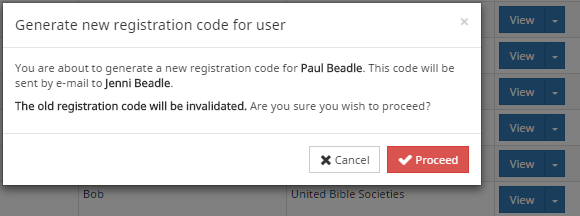
- Click Proceed
- Check your email for the code.
3.6 Register a new user (who does not have an email address)
Any administrator of a registered project can create new user registrations if they need to add people to their project. These users do not need to have an email address.
- Go to https://registry.paratext.org
- Log in if you are not already logged in.
- Click on Users
- Click the “+ Register new user” button.
- The new user registration form is displayed.
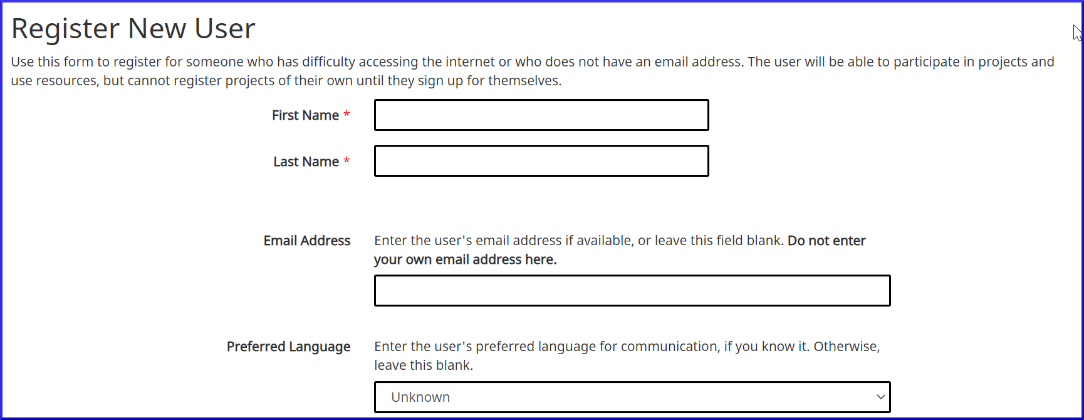
- Fill in their name, and the rest of their information.
:::🚫
A user added by someone else cannot be made an administrator of a project, nor a consultant. If you would like to make someone a consultant or administrator they must register themselves for Paratext, then you can add their name to the project.
:::
When competed, click “Create”
The server should respond by e-mailing you the user code for the new user.
The code can not be recovered again if you lose it. But you can generate a new code see 3.5
3.7 Translation project by an unrecognised individual/organisation
- If a translator is not part of a recognised organisation, s/he can apply to the BoG (boardofgovernors@paratext.org) to be members of "Independent Translators" pseudo-organization
It is unclear how many text resource owners will grant access to this group
4. CP - Creating a new project
4.1 Introduction
In this module, you will create and register a new project.
Where We are
You have already installed Paratext and registered a user.
Why is this Important
A new aspect in Paratext 9 is that projects need to be registered as well as users. This may feel like an extra complication, but it does offer benefits to users.
As we saw in the user registration section, the project administrator can create registrations for users they want to be part of their project.
What are you going to do?
We will create and register a new project.
4.2 Create a new project
File > New Project
- The New project dialog is displayed.

4.3 Name for the project
Click the Edit button
- The “edit name” dialog is displayed
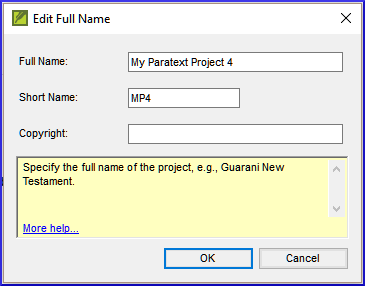
In the name section, under Full name, type a name which includes the name of the language.
Under short name enter the ISO code for the language.
Once you create a project name, the short name cannot be changed, because this is the name Paratext will give to the folder containing the project files, and also the name given to the project on the Internet server. (However, you can convert the project to a new project with a different short name. But it can take many hours to convert a project.)
4.4 Specify language
- If you have another Paratext project in the same language, you can just pick the language from the list in Paratext [2]. If not, you will need to create a new language.
- Click on New
- The Choose language identifier box is displayed .
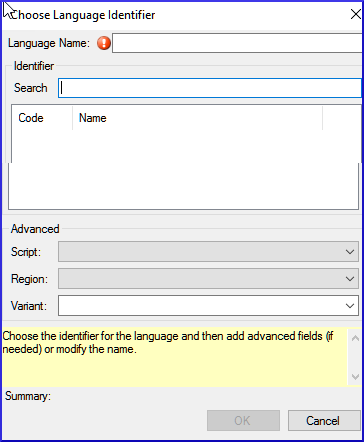
- Click in the Search box
- Start typing the name of your language
- Paratext will display matching names.
- Click on your language in the list.
- Paratext will add the language name.
- Fill in the advanced fields if necessary.
- Click OK.
You can also specify additional information if needed in the “advanced” section of the language settings dialog.
4.5 Type of project
- Click the drop-down list beside “Type of Project”
- Choose the appropriate type for your project.
- If it is a back translation, or a daughter or transliteration project, you will need to define the source.
4.6 Register the new project
- Make sure you have given the project a name and chosen the project type.
- Click Register online to go to the registration page
- Fill in the information (see above)
- Click Register to submit and return to Paratext.
- Paratext should "automagically" detect that the project is now registered,
- Click OK to create the new project.
The types of projects that do not need to be registered separately:
- Projects that inherit their inscription from the parent project.
- Back translations
- Transliterations
- Auxiliary
- Consultant notes.
4.7 Editing your registration
As you work in your project, you may wanat to change your registration information.
- From Paratext, make sure you are connected to the Internet,
- ≡ Tab, under > Project > Project Settings > Properties
- Click the “Manage registration” link.
- This will bring up the project registration info and you can edit it.
Only a project administrator can edit the registration info.
5. IR - Installing Resources
5.1 Introduction
In this module you will learn how to install resources.
Where we are
You have already installed Paratext 9 and registered a user.
Why is this important?
In Paratext 9, the resources are downloaded from the DBL (Digital Bible Library). Each user can download them directly, but if your Internet connection is limited, you can share the downloaded files with other users.
What will you do?
- Download resources from the Internet.
- Install resources from a downloaded file.
5.2 Install resources – Internet (DBL)
- Click the ≡ Paratext menu, then under Paratext, choose Download/Install resources
- A dialogue box is displayed
- Make sure Internet has been chosen.
- Filter the list by typing in the filter box (type name or language or + for enhanced)
- Click the check boxes to the left of the desired resources.
- Click Download/Install
5.3 Installer resources – files
- From the File menu, choose Download/Install resources.
- A dialogue box is displayed
- Click Folder
- Click Browse.
- Go to the folder which contains the downloaded resource files.
- Select the desired resources.
- Click Download/Install
6. PP1 - Setup Project Plan
6.1 Introduction
“Progress tracking” based on a Project Plan and Assignments and Progress is an improved feature in Paratext 9.1 that impacts the day-to-day work of translation teams.
Where We are
Before you can add the plan the project must have been created/or migrated.
Why is this Important
There are many tasks to be done in a translation project. It is important to have a system to ensure that all of these are done. It is also good to have an easy way to generate reports for supervisors and funders (see PP2: Project Plan Report).
Setting up a project plan from scratch is daunting. Various Bible translation organizations (ABU, SIL and The Seed Company) will include "basic" plans that can be applied to projects. Teams need only customize these plans within the limits set by their organizations.
Typically, organizations want conformity at the “Stage” level in order to facilitate meaningful tracking of the progress of project across the entire organization. However, every plan will need to be customized at the task level.
If a task is important to you and your team and you want to track its progress, then it can be included in the project plan (even if it doesn't require Paratext to do the task).
What are you going to do?
You will use a combination of two features: the settings of the Project Plan and the Assignments and Progress (sometimes referred to as “progress tracking”) to manage the plan by assigning team members to tasks, and tracking their progress in completing those tasks.
- Add the organizational base plan to the project (remove an old plan if necessary)
- Customize the plan for the team by adding/deleting and moving tasks
- Assign the tasks to the various team members.
- Update the base plan whenever there is a new version.
6.2 Add the organisational base plan
If you have an existing plan, you need to remove that plan before you can add another plan. (See below for instructions.)
- ≡ Tab menu, under Project > Project Settings > Project plan
- Click Manage plans
- Click below Show Base Plan
- Choose your organisational base plan
- Click the Copy Plan arrow.
- Click OK.
- The plan and its tasks are added to the project.
6.2.1 Remove current plan (before adding another)
If the project has an old plan, you need to delete each of the current stages before adding a new base plan.
- ≡ Tab menu, under Project> Project plan settings
- Click Manage plans
- Click on the last stage
- Click the Remover Stage button
- Click Yes (twice) once to confirm you want to modify the plan, and again to confirm you want to delete the tasks in the stage.
- Repeat for remaining stages
- Add the new plan (see above)
6.3 Configure the plan
6.3.1 Configure — Books to include
- [≡ Tab under Project menu > Project settings > Project properties
- Click the Books tab
- Choose the books that you want to track progress.
- Click OK
6.3.2 Configure — Assigning checks to a stage
- ≡ Tab menu, under Project, choose Project properties then Project Plan
- Click on the Checks tab
- Click on the Checks tab
- Two columns are displayed: Required stage and Optional stage.
- For the desired check, drop down the list and set the required stage [12]
- Choose the new stage or none
- Then set the Notify only (optional) to an earlier stage if any.
- Continue for each check
- Click OK
6.3.3 Configure — Reordering tasks / Move tasks to another stage
It is possible to reorder tasks and even move tasks to another stage. However, not all organisations permit this.
- From the Tab menu, under Project menu, choose Project Properties, then Project Plan
- Click the Stages/Tasks tab.
- Select the task you want to move.
- Click the up arrow or the down arrow to move the task to a different point with respect to the other tasks, or to move it to a different stage.
- You may get a messages asking to confirm.
- Click OK.
6.3.4 Configure — Add tasks
- Click on the task which is above the new task.
- Click on the Add task
- Type the name for the task and a description.
- Click OK
6.3.5 Configure — Delete tasks
- Click on the Stage/Tasks tab
- Click on the task to delete
- Click the Remove Task button
- Click OK.
6.3.6 Rename or edit tasks
- Click on the task (in the list on the left)
- Click on the name box (in the pane on the right)
- Type a new name for the task
- If necessary, edit the description.
6.3.7 Copy a task from one plan to your project
Note: Follow the steps below to copy a task from the base project plan of one project to the project plan for your project.
- Open your project [≡ Paratext under Paratext select Open].
- ≡ Tab menu, under Project select Project Settings > Project plan
- Click Manage plans
- From the "Show Base Plan" drop-down, select the project plan that contains the desired task.
- On the Current Plan side of the dialog, click the row that has the task which should precede the new task.
- If you want the new task to be the first task in the stage, select the stage name instead.
- On the Base Plan side of the dialog, hover over the task you want to add and click the solid blue arrow that appears.
- The task is copied to your project plan and cannot be copied again into this project.
Optional: To move the task, click the up arrow or the down arrow that appears when you hover over a task on the Current Plan side of the dialog.
Click OK to close the "Manage Plans" dialog.
Click OK to close the "Project Plan" dialog.
The copied task has the same name and progress rate as it had in the project plan for project ORIG.
The short name of the project is added to the plan name.
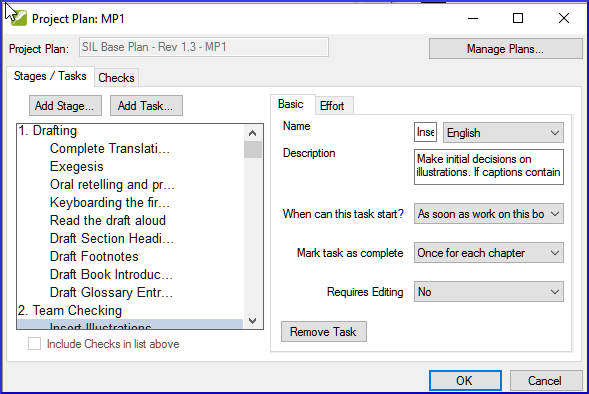
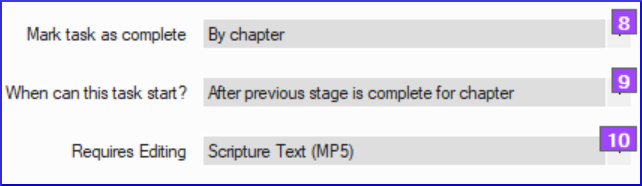
6.4 Check the settings for a task
There are three settings for each task
- how do you to mark the task as complete (once for each chapter, book or project)
- when can the task begin (anytime, or wait for another task ...)
- do you need editing permission (if so, which project)
≡ Tab menu, under Project select Project Settings > Project plan
Click the task
- The settings are shown at the bottom right
Make any changes as needed.
Repeat for any other task.
Click OK.
6.5 Priority Groups
Priority groups are a way to let Paratext know the order in which books or chapters should be worked on.
6.5.1 Using preselected set
- Open the Project menu,
- Choose Project settings and go to Define priorities
- Click Select Priority Definition Select a set (e.g. SIL Easy to Difficult set)
- a pre-selected set of books is presented.
- Click OK
6.5.2 Setting up priorities
- Open the Project menu, choose Project settings and go to Define priorities
- Select the desired books, then click Right arrow button
- Click the three dots, choose Edit
- Rearrange the books as needed by clicking on a book and moving it up or down using the arrows buttons.
- Rename the group (e.g. Gospels).
- To set specific chapters,
- Select a book name link
- Choose which chapters
- Click OK
- If you add a book which already has chapters defined it will only add the remaining chapters.
- Change order of priorities using the up arrow.
6.5.3 Using the priorities
Once priorities have been created, they can be used anywhere you would normally choose books. For instance,
- Find dialog (Ctrl+F)
- Click on choose
- Select the Priority tab.
- Assignments and Progress (blue button), book selection can be set to a priority.
- (Project menu ) Export PDF, choose
- Any window with a filter
You can also define or redefine your priorities if you need to.
6.6 Assign tasks to team members
Tasks can either be assigned individually or in bulk.
6.6.1 Assign tasks individually
- ≡ Tab menu, under Project menu, choose Assignments and Progress
- For the task to assign, click to dropdown the menu and choose the team member to do the task
- Repeat as necessary
- Click OK.
6.6.2 Bulk assign tasks
- Click the Blue Assignments and Progress button
- Choose Tasks Table
- Use the verses filter to select books
- Below the task, click Assign tasks
- Incomplete chapters can be reassigned but not completed chapters.
- A warning message will appear with options to overwrite all assignments or only those chapters that have not yet been assigned.
6.6.3 Assign Stage or book
- Click the Assign stage button (at the top of each stage).
- Change assignments for certain tasks as needed.
Once you have completed the bulk assignment process you can fine-tune the assignments in the All Tasks view
6.7 Updating the progress (for a migrated project)
For projects that have already completed a number of stages at the time of switching to Paratext 9 the Tasks table view and/or the Stage table view of Assignments and Progress can be helpful in marking multiple books, stages or tasks, as complete.
- Click on your project.
- Click the Blue Assignments and Progress button
- Choose Stages Table
- Click the ≡ Tab menu and choose Bulk Progress Mode.
Checks are temporarily turned off.

Click All stages button
- All of the stages are approved.
tipWhen you finish doing all the approvals, go back and uncheck bulk progress mode.
6.8 Saving a modified plan as a new base plan
Changes you made to your plan will be sent to the members of your project when you send/receive. If you want to share the revised plan with other teams you can save it as a new base plan.
Open your project.
≡ Tab menu, under Project select Project Settings > Project plan
Hold shift key and click Manage plans
- The manage plans dialog appears with a save as base plan button at bottom right.

Click on the Save as a base plan button
- A dialog box is displayed
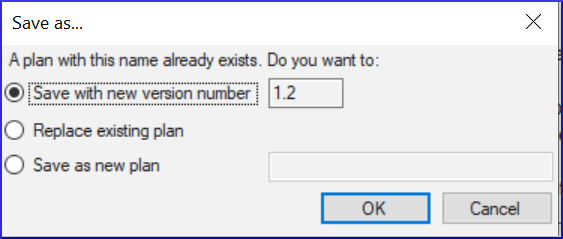
_The file will be saved to \My Paratext 8 Projects\_StandardPlans._
- Choose as appropriate, then click OK
- Share the file from \My Paratext 8 Projects_StandardPlans with the other teams.
6.9 Updating a project with a new version of the base plan
Occasionally the base plan upon which that project plan has been built will be modified. There are two ways to update the base plan.
6.9.1 Method 1
- ≡ Tab menu, under project
- Choose Project Settings then Project plan.
- A warning is displayed that there is a new version of the plan and I can migrate.
- Click the link Migrate to a new version of the project plan.
- Choose either:
- Keep the tasks that are not in the new version
- Remove all the tasks that are not in the new version
- Keep tasks that had progress.
- Click OK
- Paratext warns that you must do a send/receive,
- Click OK to clear the message
- The plan has been updated.
- A green message bar at the top gives you three options:
- Close the message
- View progress in the previous plan,
- Undo the base Plan update.
- Note the version number has been updated.
- Click OK.
6.9.2 Method 2
- Click on assignments and progress.
- If the base plan has been updated, then a message will appear showing that you can update.
- Click on Update to new version of project plan.
- Choose to keep or remove the tasks.
- When you update it will do a send receive.
- Choose one of the three options in the green message bar at the top:
- Close the message
- View progress in the previous plan,
- Undo the base Plan update.
7. Setting up a project for success
Things to consider:
It is a dynamic process
- When a project is brand new there aren’t a log of settings that can be fixed in concrete.
- As the project matures some of the inventories begin to make sense.
Who is working on the project?
- Setup the Users, Roles and Permissions
- Would it be helpful to have a “Simplified Menu”?
Do you need to customize the settings?
- custom.sty
- change settings of the stylesheet
- names of markers (in other languages)
- colour to help identify features?
- custom.vrs
- identify verses that are different from default versification
What orthography will be used?
- Put the orthography in the language settings.
- (Keep in mind that what you put in the language settings could be going to the “Speech and Language Data Repository”
How will the characters be keyed?
- Keyman/MSKLC
- AutoCorrect.txt
What Quotation system will be used?
- Set up the quotation rules (Dynamic)
- Think about your rules
- Test what you have
- Adjust the rules
- Make corrections to the rules / or text as necessary
When you have some text data:
- Begin setting up the inventories
- Let’s start at the very beginning (Characters)
- Look for options in the inventories!
- Is the item valid all the time? Or just in certain situations?
Scripture Reference Settings
- What book names are you using?
- What is the format for a reference?
- Where will you put the origin of notes?
8. CV: Convert project
8.1 Introduction
If you have ever needed to rename your project, reduce the size of your project, change user names, change the encoding or struggled with composed/decomposed diacritics, then the convert project tool will help you solve these problems.
Where We are
You must be the administrator of the project to do these conversions.
Why is this Important
Although, it is possible to make some changes to existing projects through the project and setting dialogs, several major changes require that a new project is created. Using the convert project dialog allows the new project to keep the project history.
What are you going to do?
We will work through the six changes that can be made to your project.
- Changing the short name of the project
- Removing deleted files from the project history
- Clean up Paratext Live history
- Convert encoding to 65001 – Unicode (UTF8)
- Normalising – composed or decomposed
- Replacing old User names
8.2 The convert project dialog
- From the project Tab menu, under Project, choose Advanced, then Convert Project
8.2.1 Changing the short name of the project
- Confirm that the old name of the project is correct. (If not, close the dialogue and click in the correct project window, and access the dialog again.)
- Enter the new short name for the project in [1].
8.2.2 Removing deleted files from the project history
- [2] Select this if you have deleted files (such as large illustration files) that you no longer want to be part of project history and no longer want in the project repository.
8.2.3 Clean up Paratext Live history
- [3] Select this if you have edited the project with Paratext Live and want to replace names in the project history.
8.2.4 Convert encoding to 65001 – Unicode (UTF8)
- [4] Select this to convert a standard project encoding to Unicode.
8.2.5 Normalising – composed or decomposed
- [5] Select Composed (NFC) or one of the options in the drop-down list if the data in your project was created using a mix of composed and decomposed characters. (See the Guide for more details).
8.2.6 Replacing old User names
[6] Select the name of the user you want to replace from the drop-down list.
[7] Enter the name of a registered Paratext user in this box.
[8] Click Add,
- a summary of the replacement appears, with a "Remove" button.

(Click Remove if you either made a mistake in typing the name in the "With" field OR decide not to make the replacement.)
8.3 Convert the project
- [9] Click OK to convert the project.
See the note in the guide regarding shared projects.
9. CR: Cross-references
9.1 Introduction
Most languages do not have access to concordances or other Bible study materials in their own languages. Adding cross references to your New Testament can greatly help your reader understand the text by helping your reader find passages on similar themes. There are several list availalbe (with thousands of cross-references). Some lists can be exported from a model text and then inserted at once.
Where We are
Before you can insert cross references from a model text your administrator must have created all the books (and chapters and verses) in your project. They can be empty but they must be present.
Why is this Important
Reading the New Testament is not like reading a novel. Having access to cross references allows your reader to find similar passages. Nevertheless, adding cross references one by one is too tedious. The Insert cross reference feature allows you to insert all of the cross references at once and also converts the book names and punctuation to match your Scripture reference settings. Extracting cross-references from a model text allows you to easily insert the same cross-references.
What are you going to do?
We are going to do three things:
- export the cross reference from a model text;
- make sure all the settings for book names and scripture references have been entered for your project;
- finally insert the cross references.
If you don't have a model text with the desired cross-reference, you can create your own list and import it.
9.2 Extract the references from the model text
- Open the model text.
- ≡ Tab under Tools menu, choose Cross references then Extract cross references
- Type a file name
- Click OK.
Note: Some Resource texts may not allow you to extract cross references.
9.3 Check your scripture reference settings
- ≡ Tab under Project menu, select Project Properties > Scripture Reference Settings.
- Verify that the following have been correctly defined for your project (edit them if necessary).
- The punctuation on the Reference Format tab.
- The book abbreviations on the Book Names tab.
- Click OK.
9.4 Check your Language Settings
- ≡ Tab under Project menu, select Project Properties > Language Settings …
- Click the Other Characters tab.
- In the Verse segment characters box, enter at least six different characters separated by spaces.
- Click OK.
9.5 Insert Cross references
- ≡ Tab under Project menu, point to Advanced, and then select Insert Cross References.
- Click Browse....
- Find the .xrf file of extracted cross references.
- Select the file, and click Open.
- If desired, select one or more of the options:
- (see the guide for more info)
- Click OK
If the Copyright box displays a copyright notice or required statement of acknowledgments, copy the text, and then paste it wherever you keep this kind of information for the project.